
Beyond the Basket: Air Fryer Cleaning Basics
An air fryer is a fantastic addition to any kitchen, offering a convenient and healthier way to enjoy fried foods. But like any appliance, it requires regular cleaning to maintain peak performance and ensure food safety. It's easy to let cleaning slide, especially when you're busy, but neglecting your air fryer can lead to unpleasant consequences – burnt food flavors transferring to your next meal, reduced cooking efficiency, and even a potential fire hazard from accumulated grease.
This guide will take you through everything you need to know about air fryer cleaning, from quick daily wipe-downs to a more thorough monthly overhaul. We’ll cover the best methods and cleaning agents, addressing common problems and offering preventative tips. We're aiming for a complete 2026 maintenance guide, meaning we'll focus on the best, currently available information for keeping your air fryer in top shape.
Regular cleaning isn't merely about aesthetics. Food residue and grease buildup can affect the heating element's efficiency, forcing it to work harder and potentially shortening its lifespan. Plus, a clean air fryer simply cooks better. A well-maintained appliance delivers consistent results, ensuring your food is crispy, flavorful, and safe to eat. Don't underestimate the impact of a little elbow grease!
Daily Defense: Quick Clean Routines
The key to easy air fryer maintenance is consistent, quick cleaning after each use. This prevents grease and food particles from building up and becoming difficult to remove later. The process is simple: always start by unplugging the air fryer and allowing it to cool completely – this is essential for safety.
Once cool, remove the basket and pan. Wipe them down with a damp cloth or sponge. For light residue, warm water is often enough. If needed, add a small amount of dish soap. Avoid abrasive scrubbers, as these can damage the non-stick coating. Finally, quickly wipe down the exterior of the air fryer with a damp cloth to remove any splatters or fingerprints.
Never submerge the air fryer unit itself in water. The electrical components are not waterproof and can be severely damaged. Stick to wiping the exterior with a damp cloth. A little preventative care each day will save you a lot of time and effort in the long run.
Grease Warfare: Tackling Stuck-On Food
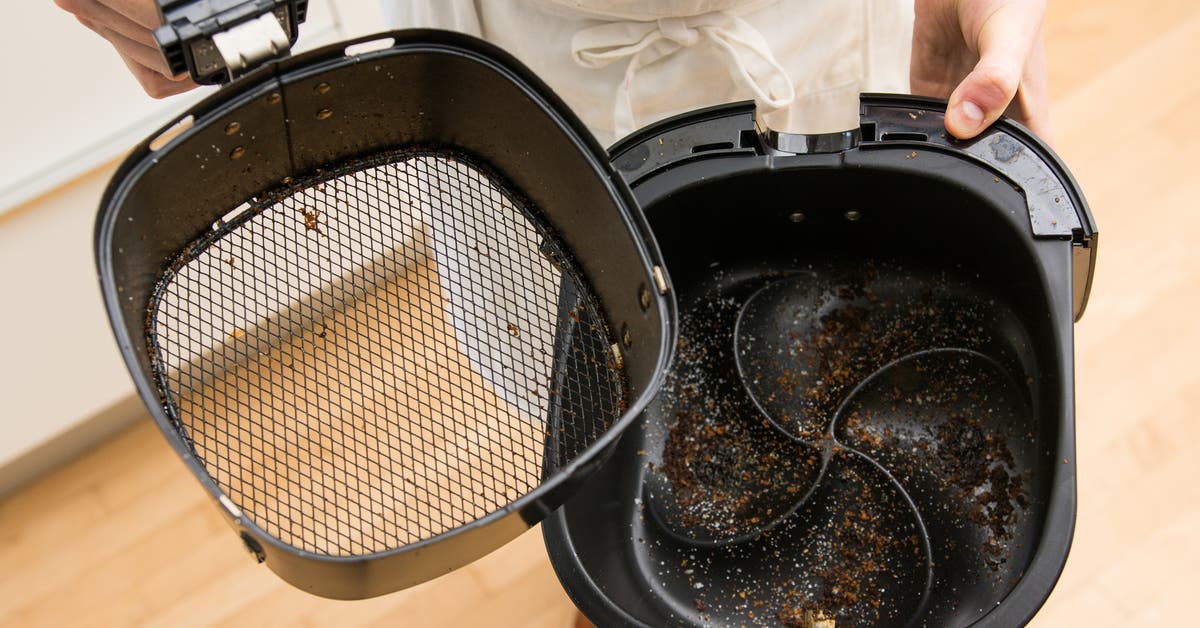
Sometimes, despite our best efforts, food gets stubbornly stuck to the basket or pan. Don't resort to harsh scrubbing immediately. The first step is soaking. Fill the basket and pan with hot, soapy water and let them sit for at least 15-30 minutes, or even overnight for particularly tough messes. This softens the baked-on food, making it easier to remove.
Several cleaning agents can be effective. Standard dish soap is a good starting point. For more stubborn residue, try a paste made from baking soda and water. Apply the paste to the affected areas, let it sit for a few minutes, and then gently scrub with a non-abrasive sponge. A vinegar solution (equal parts water and white vinegar) can also help cut through grease and grime.
I recently came across a clever hack – inspired by a cleaning guru’s tip for fruit flies from the Mirror – that could be adapted for air fryer grease. The idea is to place a small dish of vinegar near the air fryer to potentially trap fruit flies attracted by food odors. While it won’t clean the fryer, it addresses a common annoyance! When dealing with burnt-on food, avoid metal utensils, which can scratch the non-stick coating. Patience and gentle scrubbing are your best allies.
For really difficult buildup, you might consider a dedicated degreaser designed for kitchen appliances. Follow the product instructions carefully and ensure it’s safe for use on your air fryer’s materials. Always rinse thoroughly after using any cleaning agent.
Deep Dive: The Monthly Overhaul
A monthly deep clean goes beyond the daily wipe-down. This is where you address areas you might normally overlook. Start by unplugging the air fryer and allowing it to cool completely. Remove the basket and pan as usual, and wash them thoroughly.
Carefully inspect the heating element. Use a soft brush or a dry cloth to remove any loose debris. Never use water directly on the heating element. Be extremely cautious, as the element can be fragile. The Kitchen Envy air fryer, for example, has a fairly exposed heating element, so extra care is needed when cleaning this model.
Next, clean the exterior of the air fryer. Use a damp cloth with a mild detergent to remove grease splatters and fingerprints. Pay attention to any crevices or hard-to-reach areas. If you can access the inside of the air fryer body (refer to your manufacturer’s instructions), carefully wipe it down with a damp cloth. Avoid getting any moisture near the electrical components.
Finally, check the power cord for any damage. If you notice any cracks or fraying, discontinue use and consult a qualified technician. A thorough monthly cleaning will keep your air fryer running smoothly and extend its lifespan.
Dishwasher Dilemmas: What's Safe to Wash?
One of the most common questions is whether air fryer components are dishwasher safe. The answer is… it depends. Generally, the basket and pan are dishwasher safe, but always check your manufacturer’s instructions first. Philips, for example, clearly states on their website (usa.philips.com) that many of their air fryer parts are dishwasher safe.
If your manual says it’s okay to use the dishwasher, use a gentle cycle and a mild detergent. Avoid harsh detergents, as they can damage the non-stick coating. It’s best to place the basket and pan on the top rack of the dishwasher to minimize exposure to heat and water pressure. The plastic components are more susceptible to damage.
However, the air fryer unit itself should never be put in the dishwasher. The electrical components will be irreparably damaged. Also, be cautious about putting heavily soiled components in the dishwasher, as this can sometimes worsen the staining or buildup. When in doubt, hand washing is always the safest option.
- Basket: Often dishwasher safe (top rack, gentle cycle)
- Pan: Often dishwasher safe (top rack, gentle cycle)
- Unit: Never dishwasher safe
- Accessories: Check manufacturer's instructions
Air Fryer Component Cleaning Guide
| Component | Dishwasher Safe? | Recommended Cleaning Method | Notes |
|---|---|---|---|
| Basket | Yes | Dishwasher or Hand Wash | Check manufacturer's instructions; some baskets may be coated and require hand washing to preserve the coating. |
| Pan/Pot | Yes | Dishwasher or Hand Wash | Often heavily soiled; soaking in hot, soapy water before washing is recommended. |
| Drip Tray | Yes | Dishwasher or Hand Wash | Food particles can bake onto the tray; regular cleaning prevents buildup. |
| Exterior Housing | No | Damp Cloth | Always unplug the air fryer and allow it to cool completely before cleaning the exterior. |
| Heating Element | No | Gentle Wipe with Damp Cloth | Never submerge the heating element in water. Avoid abrasive cleaners. |
| Control Panel | No | Damp Cloth | Avoid getting moisture into the buttons or display. |
| Accessories (Skewers, Racks, etc.) | Yes/No | Refer to Manufacturer's Instructions | Dishwasher safety varies greatly depending on the material; always check the manual. |
Illustrative comparison based on the article research brief. Verify current pricing, limits, and product details in the official docs before relying on it.
Material Matters: Cleaning Different Fryer Types
Air fryer baskets and pans come in a variety of materials, each requiring a slightly different cleaning approach. Non-stick coatings are the most common, and they require the gentlest treatment. Avoid abrasive cleaners, steel wool, and harsh scrubbing pads, as these can scratch and damage the coating.
Stainless steel baskets and pans are more durable and can withstand a bit more scrubbing. However, avoid using harsh chemicals, as they can cause discoloration. A stainless steel cleaner can help restore shine. Ceramic-coated baskets and pans are also relatively delicate and should be treated similarly to non-stick coatings.
For non-stick surfaces, warm soapy water and a soft sponge are usually sufficient. If you encounter stubborn residue, try soaking the component in a baking soda solution. Always rinse thoroughly and dry completely before reassembling the air fryer.
Troubleshooting: Common Cleaning Headaches
Stubborn grease buildup is a common complaint. If soaking and scrubbing aren’t enough, try a dedicated degreaser. Burnt plastic smells can occur if food particles have completely carbonized. In this case, ensure the air fryer is unplugged and well-ventilated. A baking soda paste can help absorb lingering odors.
Discoloration of the basket or pan can happen over time, especially with frequent use. While this doesn’t usually affect performance, it can be unsightly. A stainless steel cleaner can help restore shine to stainless steel components. I’ve noticed on online forums like Mumsnet.com, people share similar frustrations with grime building up in hard-to-reach areas of the kitchen – the same principle applies to air fryers.
If you notice a persistent burning smell even after cleaning, it could indicate lingering food residue on the heating element. Carefully inspect the element and remove any visible debris. If the smell persists, discontinue use and consult a qualified technician.
Preventative Power: Extending Your Fryer's Life
The best way to avoid major cleaning headaches is to take preventative measures. Consider using parchment paper liners designed for air fryers (ensure they are heat-resistant and don’t interfere with airflow). Avoid cooking excessively greasy foods, as these contribute to buildup. Proper storage – keeping the air fryer clean and dry – will also help extend its lifespan. Consistent cleaning truly is the best investment you can make.

No comments yet. Be the first to share your thoughts!