
Reclaim Your Space: Why a Deep Clean Matters This Spring
Spring cleaning can feel like a huge job. But it's more than just scrubbing floors and dusting shelves. It's about resetting your living space and your state of mind. A deep clean can reduce allergens, improve air quality, and boost your mood. People often underestimate the psychological benefits of a tidy home.
A thorough spring cleaning can add value to your home. Potential buyers notice details like a sparkling kitchen, clean bathrooms, and well-maintained floors. Even if you're not planning to sell, investing time in your home is an investment in yourself. A clean, organized space promotes relaxation and reduces stress.
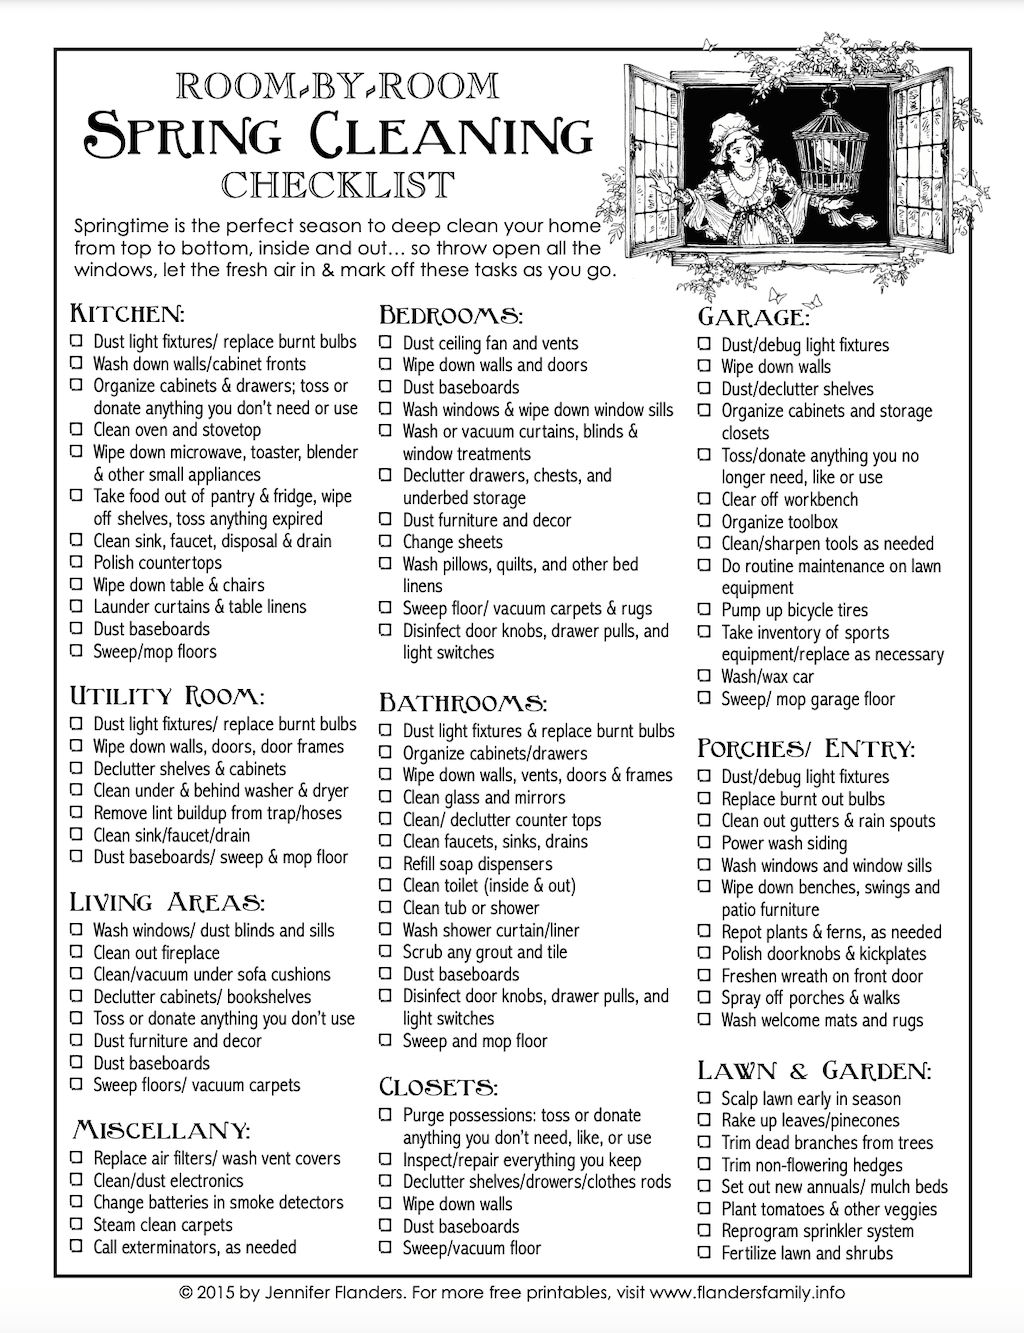
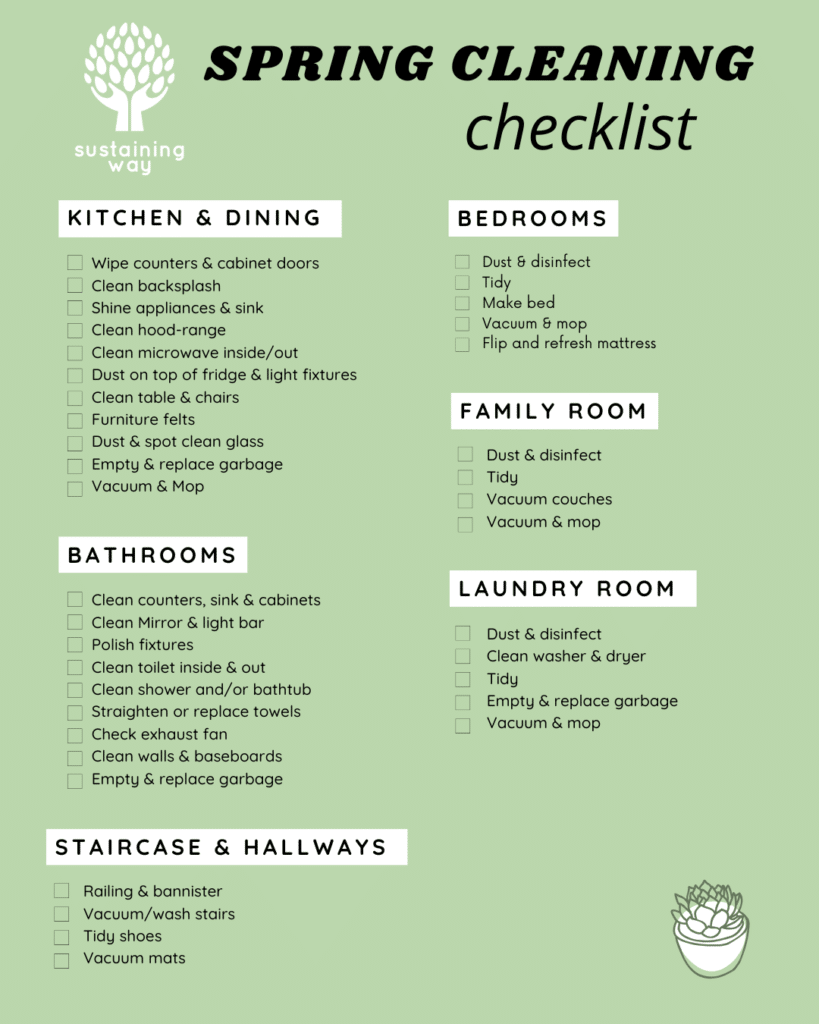
Many people feel overwhelmed by spring cleaning and don't know where to start. This checklist breaks down the process into manageable, room-by-room steps. We'll tackle one area at a time, making it less daunting and more achievable. It's about progress, not perfection.
This isn't just about surface-level tidiness. This is a deep clean—the kind that gets into forgotten corners and tackles grime that builds up over the year. It's about renewal and creating a home you enjoy. Think of it as a fresh start, a chance to breathe new life into your surroundings.
The Pre-Clean Purge: Decluttering Before You Dust
Before you grab a cleaning spray, you must declutter. It's the most important step. Cleaning around clutter wastes time and energy. You'll just move dust bunnies from one pile to another. I've made that mistake before.
Start with easy wins: expired food, old magazines, broken items. Then move on to closets and drawers. Be ruthless! If you haven't used something in a year, you probably don't need it. Ask yourself: does this item serve a purpose? Does it bring me joy? If the answer to both is no, let it go.
Donation options are plentiful. Goodwill, Salvation Army, and local charities always need items. For damaged but non-recyclable items, consider textile recycling programs. Retailers like H&M and Patagonia offer clothing recycling. Dispose of items responsibly; don't just toss everything in the trash.
The emotional aspect of decluttering is often the hardest part. We attach sentimental value to objects, even if they no longer serve a practical purpose. It's okay to feel sad about letting go, but remember you're creating space for new experiences and a more peaceful environment. Taking a picture of an item before donating it can help ease the process.
- Donate: Clothing, furniture, household goods to charities.
- Recycle: Paper, plastic, glass, and electronics.
- Discard: Broken or unusable items that cannot be donated or recycled.
- Sell: Valuable items online or at consignment shops.
Kitchen Command Center: A Deep Dive into the Heart of the Home
The kitchen is often the busiest room, and it shows. A deep clean here requires effort, but the results are worth it. Start by emptying all cabinets and drawers. Wipe down the interiors with a damp cloth and all-purpose cleaner. Check expiration dates on pantry items.
Appliances need special attention. For the oven, use the self-cleaning function or a commercial oven cleaner. Empty, clean, and organize the refrigerator. Clean the coils in the back – they accumulate dust and reduce efficiency. Dishwashers benefit from a cleaning cycle with vinegar or a cleaner like Finish Dishwasher Cleaner.
Less obvious tasks make a big difference. Clean the range hood filter to improve ventilation. Check and clean the dishwasher drain for food debris. Wipe down the microwave interior and turntable. Use baking soda paste to remove stubborn stains from countertops. I like using natural cleaning solutions whenever possible.
Organizing the pantry effectively is crucial. Use clear containers to store dry goods, label everything, and group items by category. This makes it easier to see what you have and prevents food from expiring unnoticed. I recently reorganized my pantry using OXO Good Grips containers, and it’s been a game-changer.
Bathroom Bliss: Sanitizing and Sparkling Your Retreat
Bathrooms require a strong focus on sanitization. Start by cleaning the toilet inside and out, paying attention to the base and behind the seat. Next, tackle the shower or tub. Use a mildew remover to eliminate mold and mildew. I’ve had good luck with Tilex Mold & Mildew Remover, but always follow the safety instructions.
Hard water stains can be particularly stubborn. Vinegar is your friend here. Soak a cloth in vinegar and apply it to the stains, letting it sit for 30 minutes before scrubbing. For tougher stains, try a commercial hard water stain remover like CLR Calcium, Lime, & Rust Remover. Don’t mix cleaning products, though—that can create dangerous fumes.
Don’t forget the often-overlooked areas. Clean showerheads by soaking them in vinegar overnight to remove mineral deposits. Scrub grout with a grout brush and baking soda paste. Wipe down light fixtures and exhaust fans to remove dust and grime. These small details make a big difference.
Finally, clean mirrors and floors. Use a glass cleaner for mirrors and a bathroom floor cleaner for the floor. Pay attention to corners and edges. A clean bathroom is a sanctuary, and it’s worth the effort to make it sparkle.
Bedrooms and Beyond: Creating Peaceful Sanctuaries
Bedrooms should be havens of rest and relaxation. Start by washing all bedding – sheets, comforters, pillows, mattress covers, and bed skirts. Rotate your mattress to ensure even wear. This is also a good time to flip it, if it's flippable!
Closets need attention too. Swap out seasonal clothing and donate anything you no longer wear. Organize shoes, handbags, and accessories. Utilize shelf dividers and hanging organizers to maximize space. I'm a big advocate for using the KonMari method for closet organization.
Dusting is essential in bedrooms. Use a microfiber cloth to dust furniture, electronics, and picture frames. Pay attention to ceiling fans and light fixtures. Vacuum or mop floors, and clean windows and window treatments. Curtains and blinds can be vacuumed or washed according to the care instructions.
I’m still on the fence about including stuffed animals in a deep clean. They can be dust magnets, but they also hold sentimental value. If you choose to clean them, check the care label. Some can be machine washed, while others require hand washing or dry cleaning. It's a bit tedious, honestly.
- Wash all bedding.
- Rotate and flip your mattress.
- Declutter and organize closets.
- Dust furniture and electronics.
- Vacuum or mop floors.
Living Areas & Floors: Reviving Your Common Spaces
Living rooms, dining rooms, and hallways are high-traffic areas that require regular cleaning. Start by dusting all surfaces – furniture, shelves, picture frames, and electronics. Use a microfiber cloth to avoid scratching delicate surfaces.
Floors are a priority. Vacuum carpets and rugs thoroughly, paying attention to edges and corners. For hardwood floors, sweep or vacuum, then mop with a wood floor cleaner. For tile floors, mop with a tile floor cleaner. Different flooring types require different cleaning methods, so be sure to use the appropriate product.
Upholstery needs attention too. Vacuum sofas and chairs to remove dust and crumbs. Spot clean any stains with an upholstery cleaner. Consider using a fabric protector to prevent future stains. Rugs and area carpets can be vacuumed or professionally cleaned.
Don’t forget to polish furniture to restore its shine. Use a furniture polish appropriate for the finish. Wipe down baseboards and door frames. These details make a big difference in the overall appearance of the room.
The Finishing Touches: Windows, Doors, and Those Overlooked Spots
Now it’s time for the details! Clean windows inside and out. Use a glass cleaner and a microfiber cloth for streak-free results. Clean windows not only look better but also let in more natural light, brightening up your home. It’s a surprisingly impactful task.
Wipe down doors, door frames, and baseboards. Pay attention to fingerprints and smudges. Clean light fixtures and switch plates. These are often overlooked but contribute to the overall cleanliness of a room.
Clean blinds and curtains. Dust blinds with a duster or vacuum attachment. Wash curtains according to the care instructions. Removing dust and allergens from window treatments improves air quality.
Don’t forget to clean mirrors and artwork. Use a glass cleaner for mirrors and a damp cloth for artwork. Pay attention to corners and edges. These finishing touches elevate the entire space.
Ultimate Spring Cleaning Checklist 2024: Room-by-Room Deep Clean!
Sparkle & Shine Home
Watch on YouTube →Maintaining the Sparkle: Creating a Cleaning Schedule That Sticks
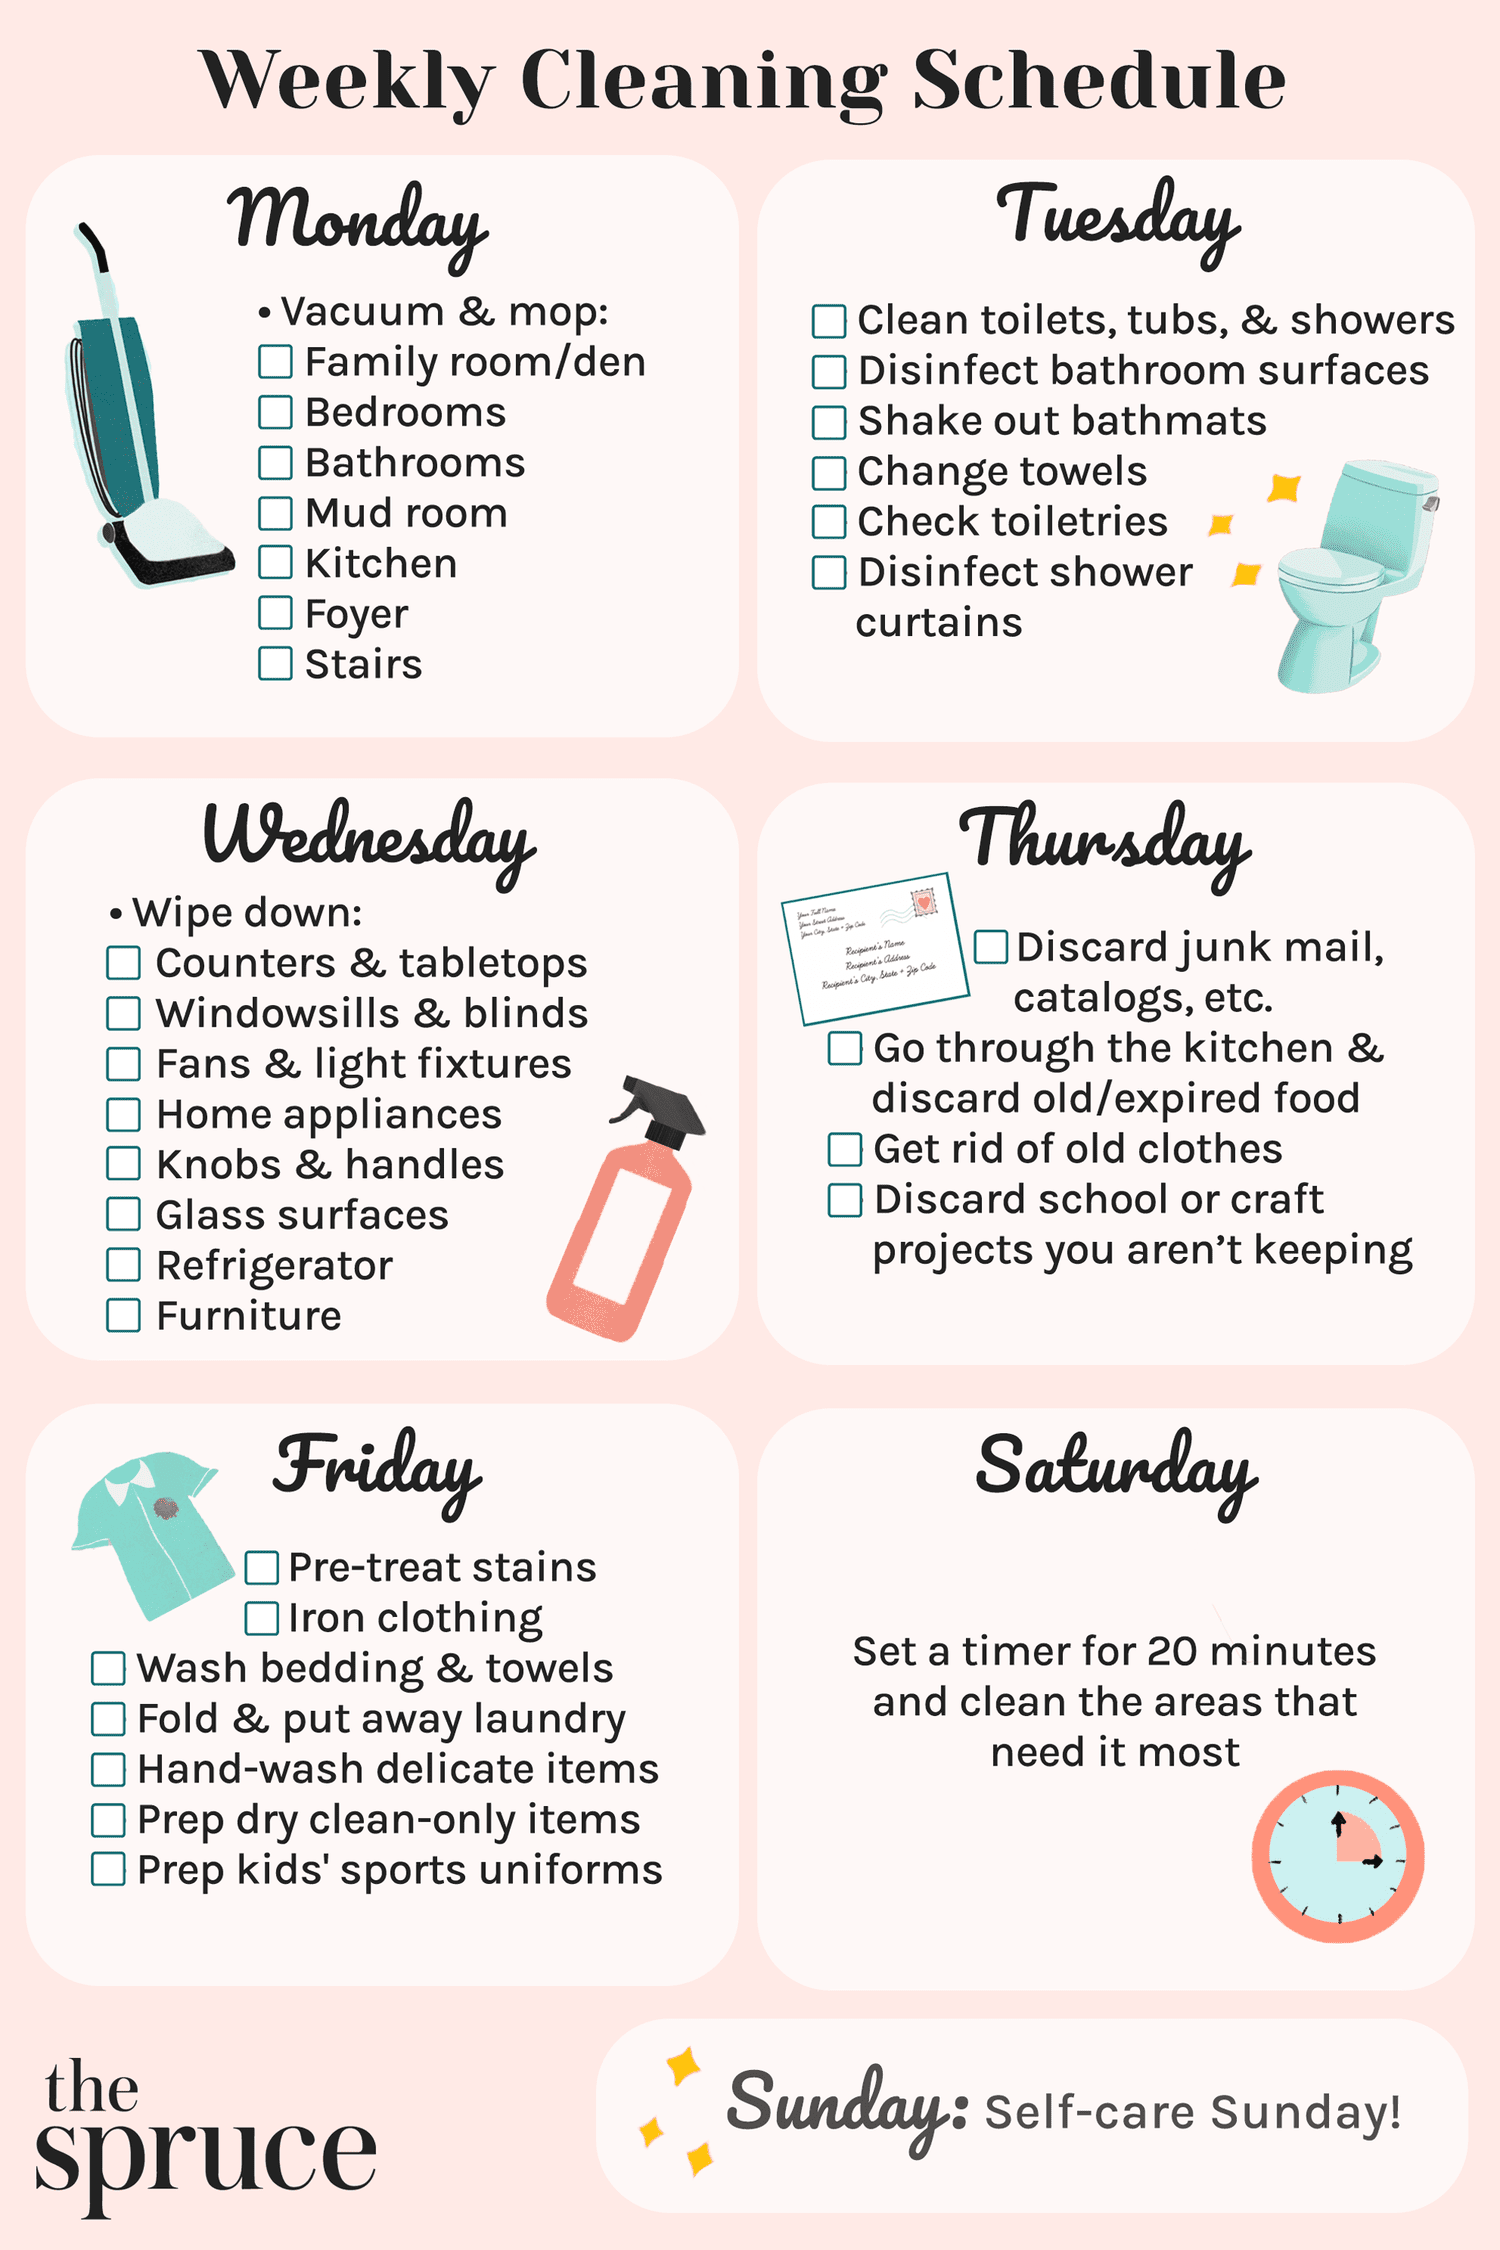
The key to keeping your home clean isn’t just a yearly deep clean; it’s consistent maintenance. Create a cleaning schedule that fits your lifestyle. This doesn’t have to be complicated—even 15-30 minutes of cleaning each day can make a big difference.
Daily tasks should include making beds, wiping down kitchen counters, and sweeping floors. Weekly tasks might include vacuuming, mopping, cleaning bathrooms, and doing laundry. Monthly tasks could include dusting furniture, cleaning appliances, and washing bedding. A little bit each day prevents things from getting out of hand.
Here’s a simple example schedule:
A consistent routine is far more effective than sporadic bursts of cleaning. It becomes a habit, and you’ll find yourself less overwhelmed by the thought of cleaning. Plus, a clean home is a more enjoyable place to live.
- Daily: Make beds, wipe counters, sweep floors.
- Weekly: Vacuum, mop, clean bathrooms, laundry.
- Monthly: Dust furniture, clean appliances, wash bedding.
Weekly Cleaning Schedule
| Day of the Week | Task | Time Estimate (minutes) |
|---|---|---|
| Monday | Vacuum all carpets and rugs | 30 |
| Tuesday | Clean Bathrooms (toilets, sinks, showers/tubs) | 45 |
| Wednesday | Dust all surfaces (furniture, shelves, picture frames) | 20 |
| Thursday | Kitchen Cleaning (counters, sink, stovetop) | 30 |
| Friday | Mop hard floors (kitchen, bathrooms, hallways) | 25 |
| Saturday | Laundry - Wash, dry, fold and put away all laundry | 60 |
| Sunday | Change bed linens and tidy bedrooms | 20 |
Data sourced from AI research — verify before making decisions

No comments yet. Be the first to share your thoughts!